Since I just got myself a new server with m.2 slots available, I bought myself some cheap NVMe m.2 SSD’s. I planned one for placing some local VM’s on and get some good performance, the other was planned to be used as a caching SSD for use with FreeNAS. I was expecting to just plug them in and see them show up as disks in ESXi, create a datastore and off we go, easy right! Well… they didn’t show up.
A lot has happened since this post was written, please start from this new post before continuing to make sure you won’t waste your time!
Please note: I am using non HCL hardware, the following is NOT supported by VMware, use at your own risk. Using HCL validated hardware will make sure you don’t have these problems.
Identifying the problem
Troubleshooting starts, I have to find out what exactly is going on. First of all, the first thing I noticed is that the drive actually does show up on the Storage -> Adapters list as “Non-Volatile memory controller”, which is interesting, apparently ESXi does see the drive, but it does not report any Device or usable disk space when trying to create a datastore. It does show it’s connected with the NVMe driver. Also, side-note, the SSD I’m using is an XPG Gammix S11 Pro.

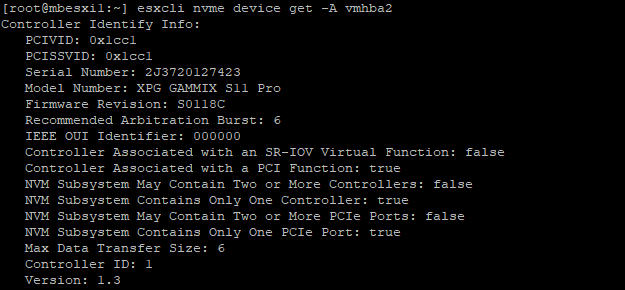
Troubleshooting some more on the ESXi CLI, I can successfully identify the SSD, showing it’s fully functional. I get triggered by the NVMe version, it shows 1.3, might there be something wrong with the driver or the disk not supporting this version?

After some more (web) searching, I figured out that NVMe 1.3 was long supported and shouldn’t be a problem. At this point I decided to install an older version of ESXi, instead of 6.7 U2, I installed 6.7 GA. To my surprise, it suddenly worked!
Fixing the ESXi drivers
So, apparently something changed with the NVMe drivers of ESXi between 6.7 GA and 6.7 U2. As soon as I started searching the web I found a fellow blogger that ran into this exact problem before ⧉, only with VSAN SSD’s. The solution was to downgrade the NVMe driver to the one from the 6.7 GA image. Now, there were a few things I ran into that weren’t very clear and you never know when a website goes down, so you can find the way I solved it below.
Since we are working within the same main version of 6.7, the older driver can be installed without giving any other compatibility problems, this means simply installing the VIB for the NVMe driver in 6.7 GA will fix our problems. There are two ways, an easy and a little less easy way of installing this VIB onto your ESXi hosts.
The easy way
The easy way consists of simply running two esxcli commands in SSH, this does require your host to have internet access. Please reboot your host after installing both VIB’s. If for any reason the VIB’s are removed from hostupdate.vmware.com, please skip to the little less easy way.
Optional: If you want to check the current version of the VIB’s before and after updating, please use esxcli software vib list | grep nvme
1
2
esxcli software vib install -v https://hostupdate.vmware.com/software/VUM/PRODUCTION/main/esx/vmw/vib20/nvme/VMW_bootbank_nvme_1.2.1.34-1vmw.670.0.0.8169922.vib
esxcli software vib install -v https://hostupdate.vmware.com/software/VUM/PRODUCTION/main/esx/vmw/vib20/vmware-esx-esxcli-nvme-plugin/VMware_bootbank_vmware-esx-esxcli-nvme-plugin_1.2.0.32-0.0.8169922.vib
The little less easy way (still easy…)
So if your hosts don’t have access to the internet, the files are removed from hostupdate.vmware.com or you just have a reason to never to take the easy way, there is some manual work involved.
Optional: If you want to check the current version of the VIB’s before and after updating, please use esxcli software vib list | grep nvme
- Get your hands on any ESXi 6.7 GA image depot. This is the zipped file containing all the vibs. I got
VMware-ESXi-6.7.0-8169922-depot.zip. - Extract the files somewhere.
- Find the following files:
VMware-ESXi-6.7.0-8169922-depot/vib20/nvme/VMW_bootbank_nvme_1.2.1.34-1vmw.670.0.0.8169922.vibVMware-ESXi-6.7.0-8169922-depot/vib20/vmware-esx-esxcli-nvme-plugin/VMware_bootbank_vmware-esx-esxcli-nvme-plugin_1.2.0.32-0.0.8169922.vib
- Use your favorite SFTP client to upload both VIB’s to the host’s
/tmpfolder. - On the host, execute the following commands:
1 2
esxcli software vib install -v /tmp/VMware_bootbank_vmware-esx-esxcli-nvme-plugin_1.2.0.32-0.0.8169922.vib esxcli software vib install -v /tmp/VMW_bootbank_nvme_1.2.1.34-1vmw.670.0.0.8169922.vib - Now reboot the host.
Success!
I can now see my NVMe drives and create a datastore.


